
Hand-Release Push-Up Technique: Avoid These Common Mistakes
1. Introduction
Most people think they’re nailing the Hand-Release Push-Up Technique—but are they really?
This exercise might seem simple: lower your chest, lift your hands, and push back up. Yet during the Army Combat Fitness Test (ACFT) or any serious workout, even tiny flaws in hand-release push-up form can cost valuable points or lead to strain.
The Hand-Release Push-Up Technique is a modern evolution of the classic push-up, created to ensure full range of motion and eliminate half-reps. It’s essential for soldiers, athletes, and fitness enthusiasts because it demands total body control and prevents “cheating” through momentum. When done correctly, the proper hand-release push-up builds strength evenly across the upper body while promoting balance and endurance.
Beyond performance, the Hand-Release Push-Up Technique helps prevent shoulder and lower-back injuries by improving alignment and stability.
In this complete guide, readers will learn:
- What defines a proper hand-release push-up
- The biomechanics behind correct hand-release push-up form
- A full step-by-step breakdown of each phase
- The top seven hand-release push-up mistakes and how to fix them
By mastering the Hand-Release Push-Up Technique, anyone—whether training for the Army hand-release push-up test or general fitness—can improve their strength, endurance, and test scores safely and effectively.
2. What Is a Hand-Release Push-Up?
The hand-release push-up is a strict, standardized version of the traditional push-up. Unlike the classic movement, where people might stop halfway down, this version requires the chest to touch the ground fully before briefly lifting both hands off the floor—resetting each repetition.
This small but important hand-lift eliminates momentum and ensures every muscle works equally through a full range of motion. It’s designed to measure real strength and endurance, especially in military tests like the ACFT.
Difference Between Regular and Hand-Release Push-Ups
- Range of Motion: A proper hand-release push-up demands chest-to-ground contact, while regular push-ups often stop short.
- Reset: The hand release eliminates bouncing and partial reps.
- Muscle Activation: Each rep requires a fresh start, forcing consistent use of the chest, triceps, shoulders, and core.
Because of this deeper range, hand-release push-up form targets multiple muscle groups more efficiently—especially the chest, triceps, anterior deltoids, and abdominals. It also teaches full-body control, making it ideal for both functional training and Army hand-release push-up test preparation.
3. Why Form Matters: The Science Behind Proper Technique
Perfecting hand-release push-up form is more than just meeting standards—it’s about protecting the body and maximizing performance.
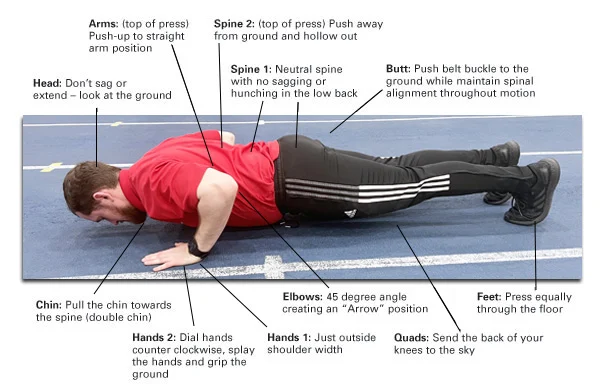
Biomechanically, the Hand-Release Push-Up Technique emphasizes alignment from head to heel. This straight-line structure engages the right muscles while minimizing stress on joints.
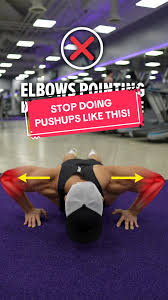
Poor hand-release push-up form—like sagging hips or flared elbows—creates uneven pressure that can strain the shoulders and lower back. Maintaining shoulder stability in push-ups and proper body alignment ensures safe, consistent movement.
Key Benefits of Proper Hand-Release Push-Up Form:
- Activates the chest and triceps evenly
- Keeps the spine neutral and core tight
- Reduces risk of shoulder strain or lower-back pain
The Hand-Release Push-Up Technique promotes better strength transfer by forcing the body to stabilize between reps. In military tests, this precision ensures every repetition counts—since evaluators watch for consistent, controlled movement. With proper posture and muscle engagement, the correct hand-release push-up position becomes second nature, improving both performance and safety.
4. Step-by-Step Guide: How to Perform a Hand-Release Push-Up Correctly
Performing the Hand-Release Push-Up Technique correctly involves five critical phases.
Follow this step-by-step hand-release push-up tutorial to master every part of the movement.
1. Starting Position
- Lie face-down on the ground with feet shoulder-width apart.
- Place palms under the shoulders with fingers pointing forward.
- Engage the core and squeeze glutes to maintain a straight line.
- Keep eyes slightly forward to promote good hand-release push-up form.
2. Lowering Phase
- Inhale and bend elbows to lower the chest until it gently touches the floor.
- Maintain full-body tension; don’t drop suddenly.
- Keep elbows at roughly a 45-degree angle for shoulder stability in push-ups.
3. Hand Release and Reset
- Once the chest and thighs contact the ground, lift both hands completely off.
- Hold briefly—this confirms proper range of motion and breaks momentum.
- Keep the body stiff and core engaged; this step defines the proper hand-release push-up.
4. Push-Up Phase
- Exhale and push through the palms, driving the chest and hips up together.
- Avoid arching the back; maintain straight alignment.
- Focus on even pressing power through chest and triceps.
5. Lockout and Repetition Control
- At the top, arms are fully extended, and the body forms a straight line.
- Pause briefly before starting the next rep. Controlled movement ensures clean repetitions under the Army hand-release push-up test.
Pro Tip for ACFT Candidates:
Follow a Hand-Release Push-Up Technique rhythm: three seconds lowering, one-second pause, one-second push-up. This tempo promotes endurance and consistent scoring.
Practicing this hand-release push-up technique regularly builds muscle memory, ensuring efficient and accurate performance when it matters most.
5. Top 7 Common Hand-Release Push-Up Mistakes
Even experienced athletes make hand-release push-up mistakes that hurt progress or disqualify reps. Recognizing and fixing these common push-up errors ensures safer training and better results.
1. Not Releasing Hands Fully
Many lifters lift their palms only halfway.
Why it happens: Rushing or misunderstanding the movement.
Fix it: Pause briefly until both hands clearly leave the floor—essential for proper Hand-Release Push-Up Technique.
2. Letting Hips Sag or Rise
Incorrect hip positioning breaks alignment and strains the lower back.
Why it happens: Weak core muscles.
Fix it: Strengthen abs and glutes; engage them through every rep for better hand-release push-up form.
3. Poor Hand Placement (Too Wide or Too Narrow)
Incorrect width affects stability and shoulder engagement.
Why it happens: Inconsistent setup.
Fix it: Hands should align directly under shoulders for a proper hand-release push-up.
4. Failing to Engage Core
Without proper core tension, form deteriorates quickly.
Why it happens: Shallow breathing or fatigue.
Fix it: Brace your core like you’re preparing for impact. It improves posture and reduces back strain.
5. Rushed Repetitions (No Control)
Speed kills accuracy.
Why it happens: Trying to boost rep count without form awareness.
Fix it: Prioritize technique. Controlled, steady reps outperform sloppy fast ones, especially in the Army hand-release push-up test.
6. Lifting Chest Before Hips
An uneven push damages the flow of the Hand-Release Push-Up Technique.
Why it happens: Weak posterior chain.
Fix it: Move the body as a single unit—hips and chest rising simultaneously.
7. Incomplete Range of Motion
Partial reps miss the point of the Hand-Release Push-Up Technique.
Why it happens: Poor flexibility or fatigue.
Fix it: Focus on touching the chest fully to the ground each rep. Regular mobility work supports full range.
By eliminating these hand-release push-up mistakes, athletes can improve their overall performance, ensure safety, and meet proper hand-release push-up standards every time.
6. How to Improve Your Hand-Release Push-Up Performance
Once solid hand-release push-up form is established, the next goal is steady progress. Improving your Hand-Release Push-Up Technique takes focused effort, consistency, and strategic training. Whether training for the Army hand-release push-up test or personal strength development, these methods help boost performance efficiently.
1. Controlled Tempo Training
The easiest way to reinforce a proper hand-release push-up is by slowing down each phase. Using a 3-1-1 tempo (three seconds down, one for hand release, one for push-up) develops control and endurance.
This deliberate rhythm enhances strength while allowing you to focus on hand-release push-up technique under fatigue.
2. Strengthen the Core and Shoulders
A stable midsection and shoulder girdle are crucial for clean repetitions.
Add plank variations, hollow holds, and scapular push-ups to your routine.
These build shoulder stability in push-ups and core strength, preventing sagging hips and uneven presses.
3. Mobility and Flexibility Work
Tightness in the chest or wrists can limit proper range. Prioritize flexibility for better hand-release push-up form:
- Wall chest stretches
- Wrist rolls and rotations
- Foam rolling the pecs and shoulders
Improved mobility promotes smoother movement and complete range of motion.
4. Progressive Overload
To improve hand-release push-up performance, increase the challenge gradually.
- Add 1–2 reps per week
- Extend working time for endurance
- Use a light weight vest once bodyweight reps exceed 40
This gradual overload leads to better strength endurance training—ideal for military readiness and long-term development.
5. Mini-Workout Plan for All Levels
Beginner (2–3 sets):
- 10 hand-release push-ups
- 20-sec plank
- 15 incline push-ups
Intermediate (3–4 sets):
- 15–20 hand-release push-ups
- 10 scapular push-ups
- 30-sec side planks
Advanced (4–5 sets):
- 25–30 hand-release push-ups
- 10 explosive push-ups
- 1-minute plank hold
Consistency in the Hand-Release Push-Up Technique not only improves raw strength but ensures every repetition meets Army hand-release push-up standards.
7. Army ACFT Standards & Scoring Explained
In the Army Combat Fitness Test (ACFT), the hand-release push-up test assesses muscular endurance and upper-body control. Every repetition must demonstrate the proper hand-release push-up form to count toward the total score.
How It Works
Each participant performs as many push-ups as possible within two minutes. Every valid rep includes:
- Full body contact with the floor
- Clear release of both hands
- Simultaneous lift of chest and hips
The Hand-Release Push-Up Technique was adopted to ensure consistency and fairness—eliminating partial reps and ensuring maximum range of motion.
ACFT Scoring System
Scoring under the Army hand-release push-up test is based on total valid repetitions:
- Minimum pass (60 points): ~10–20 reps
- Maximum score (100 points): 57+ for men, 53+ for women
Proper execution and rhythm directly affect results. Failing to meet hand-release push-up standards—such as incomplete releases or uneven lifts—results in non-counted reps.
Tips for Success
- Maintain constant hand-release push-up form throughout
- Train with a timer to simulate test conditions
- Avoid burnout—focus on efficient pacing
Consistent adherence to the Hand-Release Push-Up Technique ensures higher scores and greater physical readiness during ACFT testing.
8. Injury Prevention & Safety Tips
One of the greatest benefits of mastering hand-release push-up technique is injury prevention. Poor alignment and fatigue can strain the shoulders, wrists, or lower back.
Proper preparation and recovery are essential for safe training.
Warm-Up Routine
Before any hand-release push-up training, perform mobility drills:
- Arm circles, shoulder rolls, and scapular squeezes
- Cat-cow stretches for the spine
- Forearm and wrist mobility drills
This prepares the body for tension and improves push-up injury prevention.
During Training
Focus on consistent hand-release push-up form—keep the spine neutral, core tight, and hips level. Avoid arching the back or shrugging shoulders.
Breathing is key: inhale while lowering, exhale as you press.
Cool-Down & Recovery
After performing multiple sets of hand-release push-ups, stretch gently:
- Doorway chest stretch
- Child’s pose
- Light triceps and forearm stretches
Recovery allows muscles to repair and adapt, ensuring sustainable safe hand-release push-up training and preventing shoulder strain.
9. Advanced Variations & Progressions
Once the basics are mastered, advanced versions of the Hand-Release Push-Up Technique can build explosive power and endurance.
Each variation challenges a different aspect of strength while keeping movement integrity.
1. Tempo Hand-Release Push-Ups
Increase time under tension with slower eccentric motion.
A 5-1-3 tempo (five seconds down, one-second release, three seconds up) develops deeper muscular control.
2. Weighted Vest Hand-Release Push-Ups
Add resistance once confident with bodyweight reps. Weighted push-ups enhance upper body strength training and simulate real-world load-bearing.
3. Explosive or Power Variations
Push explosively off the ground after the release. This advanced form builds power for tactical and athletic performance.
4. Mixed Grip and Elevated Progressions
Vary hand width or elevate the feet to increase intensity. These variations strengthen stabilizers and improve overall hand-release push-up performance.
Each advanced hand-release push-up should be introduced slowly to preserve proper hand-release push-up form and prevent fatigue-related breakdowns.
10. Conclusion
The Hand-Release Push-Up Technique stands as one of the most effective bodyweight exercises for developing endurance, strength, and stability.
Perfecting hand-release push-up form means more than just earning points—it represents mastery of control and precision.
By avoiding hand-release push-up mistakes, maintaining consistent form, and training progressively, anyone can achieve the standards required for the Army hand-release push-up test while improving general fitness.
The formula for success is simple: consistent practice, discipline, and attention to detail.
When quality reps take priority over speed, the Hand-Release Push-Up Technique becomes not just a test of strength—but a symbol of resilience and performance excellence.
❓ FAQs
Q1: What muscles do hand-release push-ups work?
They primarily develop the chest, shoulders, triceps, and core—making the Hand-Release Push-Up Technique a comprehensive upper-body strength exercise.
Q2: How are hand-release push-ups scored in the ACFT?
Scores are based on valid repetitions in two minutes. Each rep must show full range, visible hand release, and synchronized movement—hallmarks of the proper hand-release push-up.
Q3: How do I prevent back pain during push-ups?
Engage your core to maintain alignment. The correct hand-release push-up position keeps hips and shoulders in one line, reducing lumbar stress.
Q4: Can beginners do hand-release push-ups?
Yes. Start with incline or knee modifications while focusing on hand-release push-up form and control.
Q5: What’s the difference between regular and hand-release push-ups?
The Hand-Release Push-Up Technique requires the chest to fully contact the ground and hands to lift briefly before pressing up—guaranteeing a full range of motion and uniform rep quality.
Q6: How often should I train hand-release push-ups?
2–3 times weekly is ideal. Alternate with other upper body strength training to allow recovery.
Q7: Are hand-release push-ups better for endurance or strength?
Both. The Hand-Release Push-Up Technique builds endurance through controlled volume and raw power through full engagement.
Q8: How can I increase my push-up count quickly?
Focus on push-up progression exercises, maintain consistent form, and integrate tempo work for control and stamina.